These instructions are combination of different instructions I have found over the years. For each step I chose the algorithms that were the easiest to learn for me.
My first instructions were from an article in the German magazine Der Spiegel from 1981. I still like the graphic representation of the moves from that article, so my graphics are based on it. The algorithms for edge orientation and corner orientation in the last layer are from that article, too.
I use my own short version of the Daisy and White Cross part for the first layer, but it’s so intuitive that you will find the same move in many other instructions.
I’ve found the algorithm for corner permutation years ago somewhere in the web, but I don’t remember where. It was much easier than the one I used before and I kept using it until I changed to the CFOP method.
Most of the rest of the algorithms is from Robbie Gonzalez’ article on WIRED.com and his embedded YouTube videos. He learned his way of solving the cube layer by layer in under a minute from WCA cofounder Tyson Mao. A lot of the algorithms are based on a pair of simple left and right trigger moves that are easy to learn and fast to execute.
So let’s start…
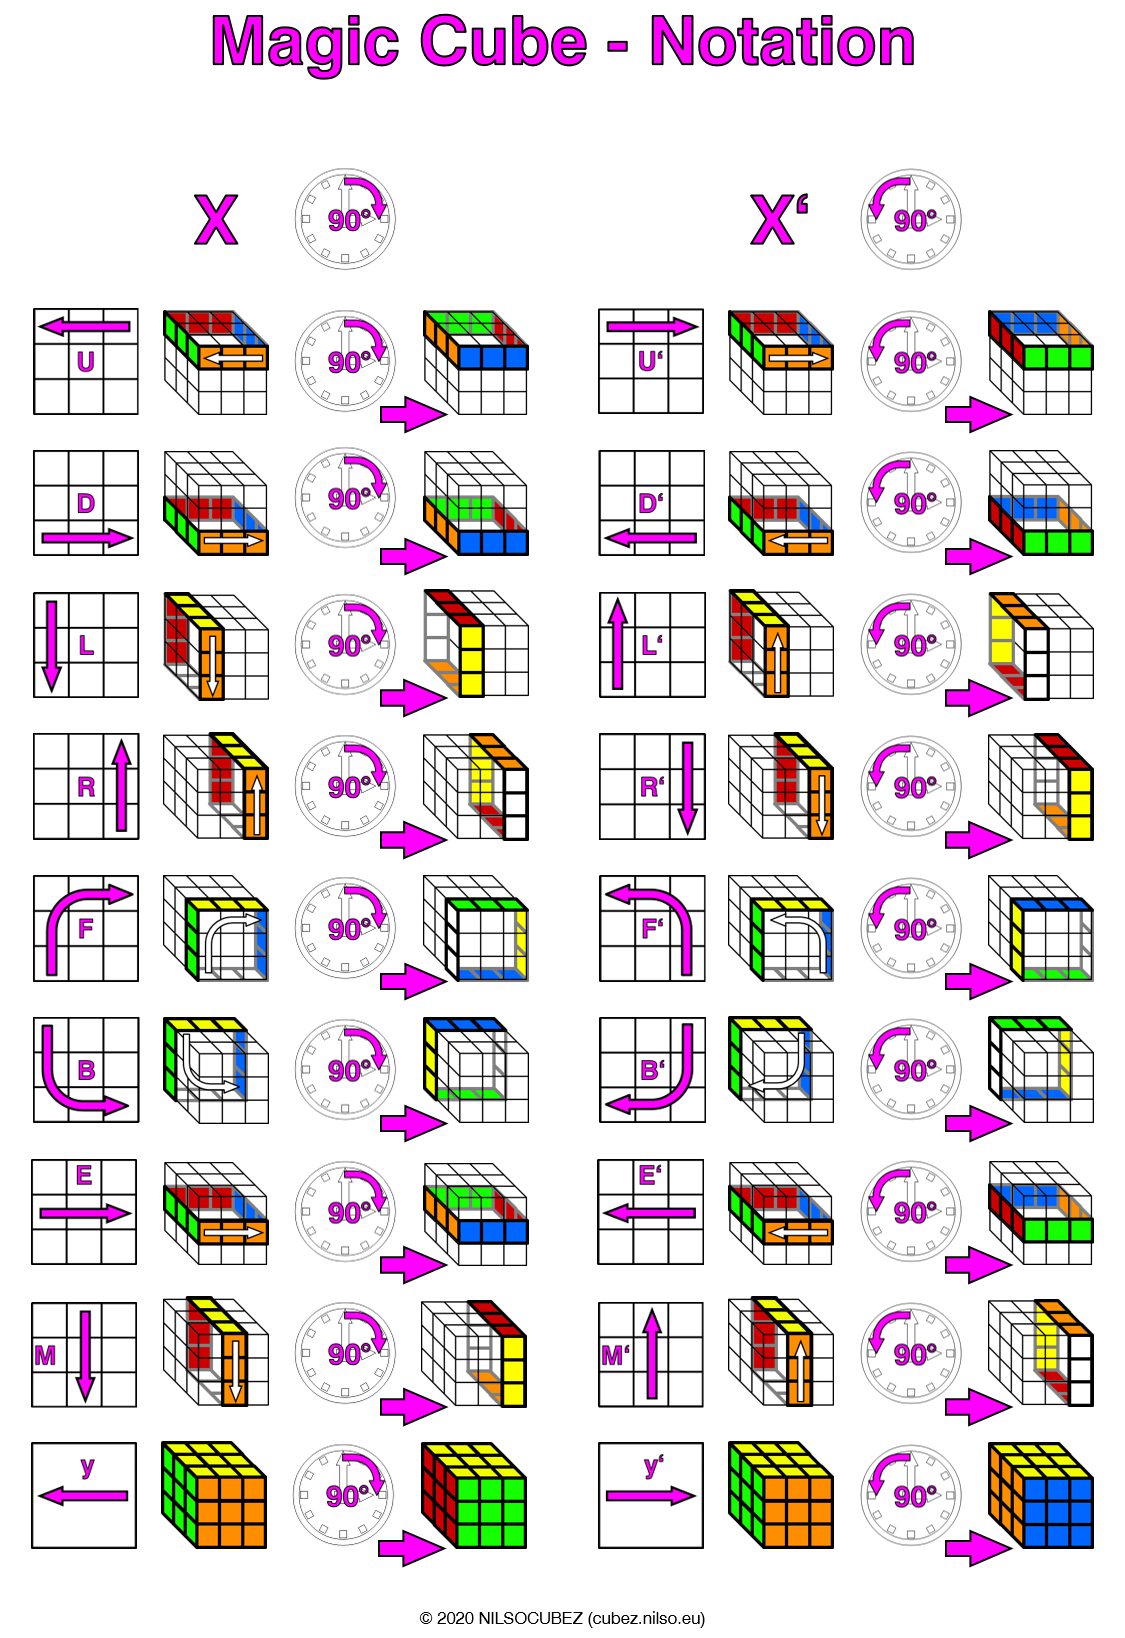
First things first: To learn and understand the algorithms to solve the cube I use a combination of squares and arrows combined with the most commonly used “letter codes” for algorithm notation.
An algorithm is a combination of single 90 deg turns of a single layer of the cube. Each algorithm has the purpose of solving a part of the cube without destroying the part that has been solved before.
Usually a 180 deg turn of a layer is represented by a number 2 following the letter code. For my graphic representation I use a double symbol of the 90 deg turn instead.
These are the basic turns of the cube that I use in my instructions. You can find further details about the notation here.
First Layer
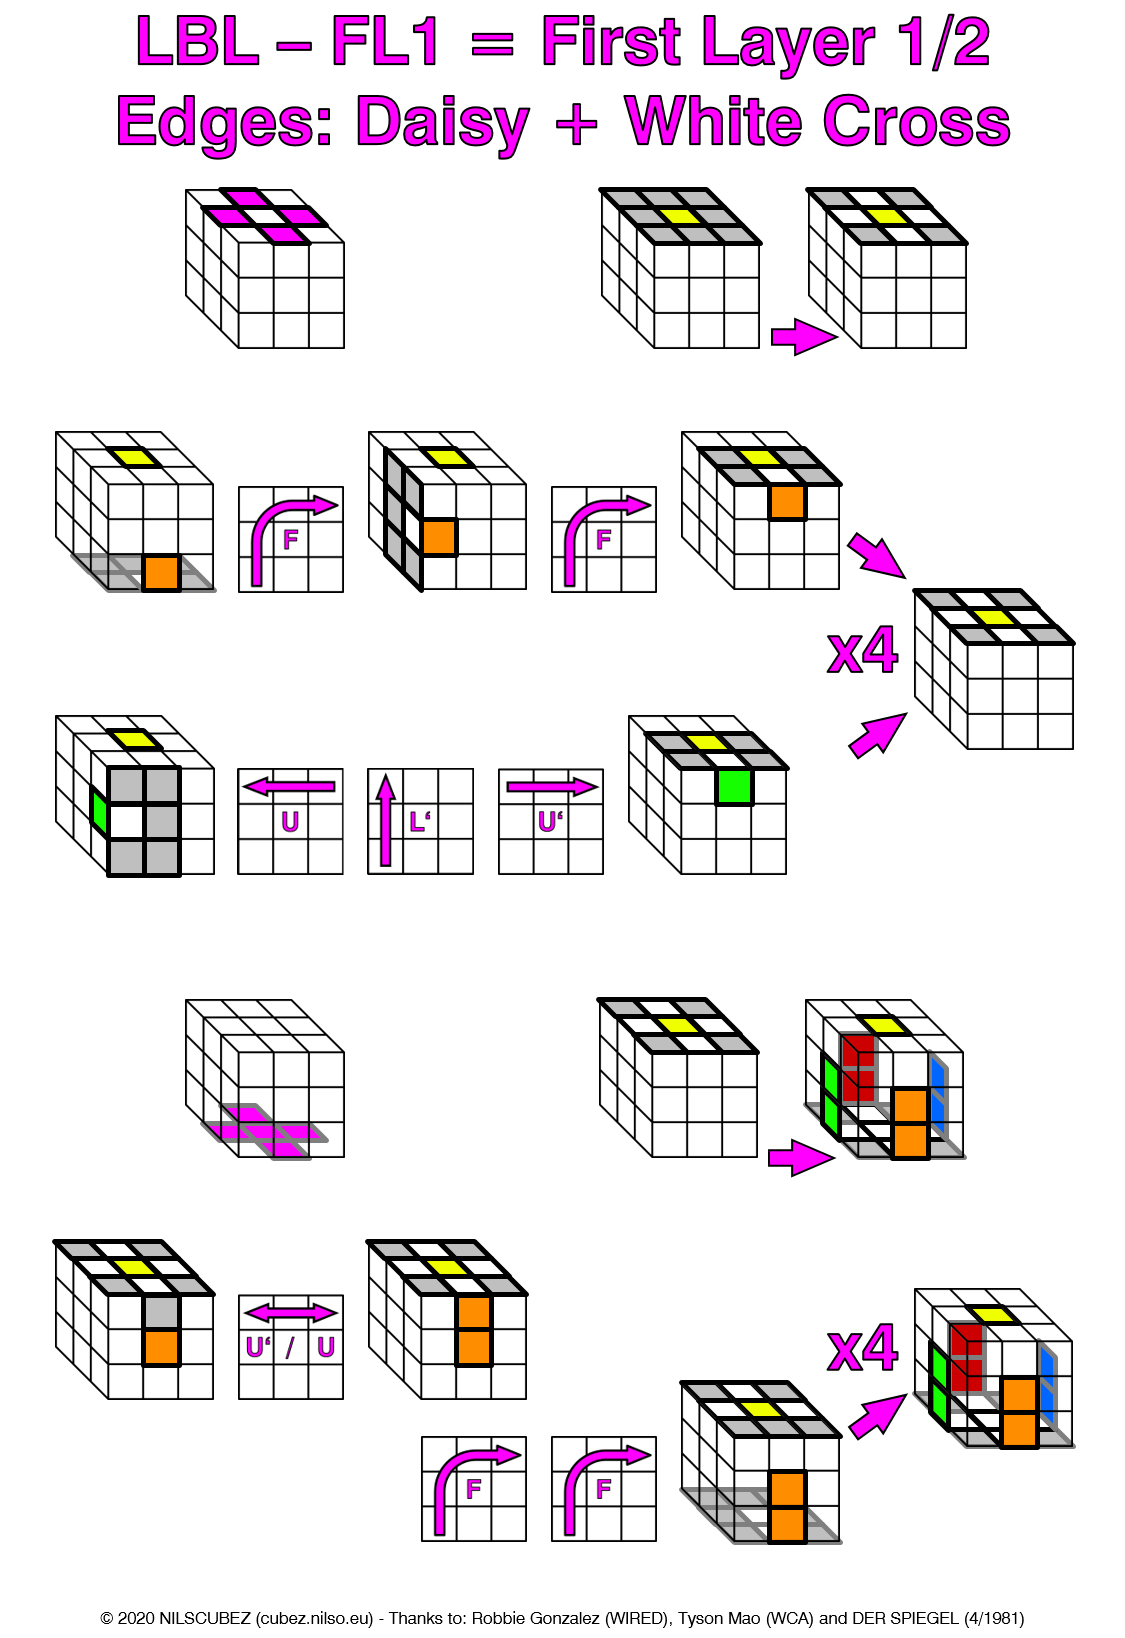
1.) The Daisy
Beginners usually start to learn how to solve the cube with the white side as the Down side and the yellow side as the Up side. So the first part of the cube that is solved, is the (white) cross on the Down layer. As a first step the four edge pieces with white stickers are positioned around the yellow center piece of the Up side.
With the yellow center and the white “leaves” the resulting cross looks like a daisy. If by coincidence you also get one or another white corner next tor the white egde pieces, you can ignore that. only the edge pieces are important.
You won’t really need a detailed algorithm to solve the daisy. It’s quite intuitive, so with some practice by “playing around” you will be able to solve the daisy very quickly. Anyway, you can find some basic moves below.
2.) The (White) Cross
Once you have solved the Daisy you can go on to solve the white Cross on the Down layer. The goal is not only to get the white side of the edge pieces next to the white center piece. We also want to have the edge pieces in the correct position right under their corresponding centre pieces.
So you start with a first centre piece in the front and turn the Up Layer until the colour of the edge piece in the Daisy and the centre piece below have matching colours. Then you turn the Front layer by 180 deg to move the edge piece to the Down layer. Repeat that with the other three centre pieces and their corresponding edge pieces and you will have the white Cross solved in the Down layer.
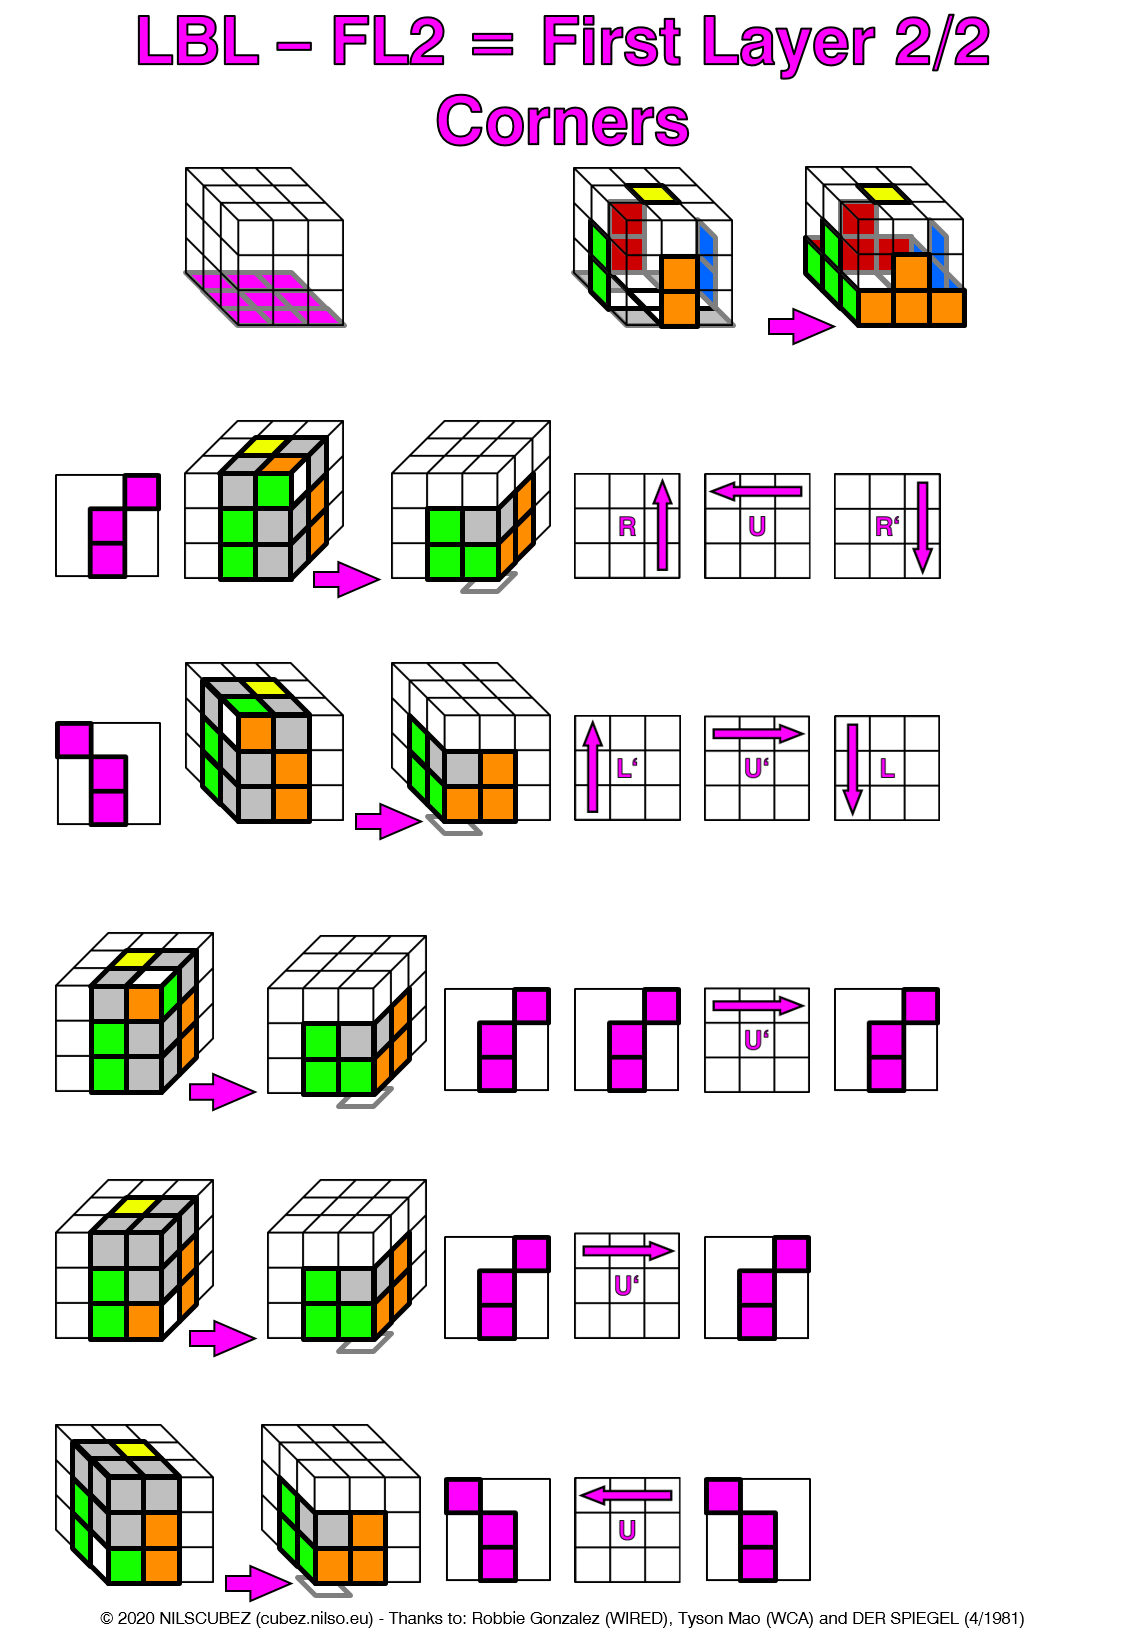
3.) (White) Corners
To finish the first layer all corner pieces with a white side will have to be positioned in their right place in the Down layer. An easy way to do that is using a 3-step algorithm, a so-called Trigger Move. The more you practice this Trigger Move the faster you will be able to apply it. After a while you will be able to apply it automatically after triggering the move with its first step.
There is a left and a right version of the algorithm. Depending on the situation you will need each of them for the next steps. The algorithms are represented by a square with three small squares inside forming a (chess) knight’s move pattern.
You start with a corner piece in the Up layer with the white side of the corner piece on the side. Then you position this corner piece with its front side diagonally above the centre piece of the same colour.
With the white cross solved before, you will have a pattern of a (chess) knight’s move on the Front side of your cube. You can either have a left or right knight’s move pattern. To position the corner piece in the Down layer you just apply the corresponding left or right algorithm.
For all possible other positions and orientations of the corner pieces you can also find algorithms below. Repeat those algorithms until you have all 4 corner pieces in their right place in the Down layer.
After that you will not only have the white Down side solved but also the four sides of the down layer, forming (Tetris) Ts with the centre pieces above.
Second Layer
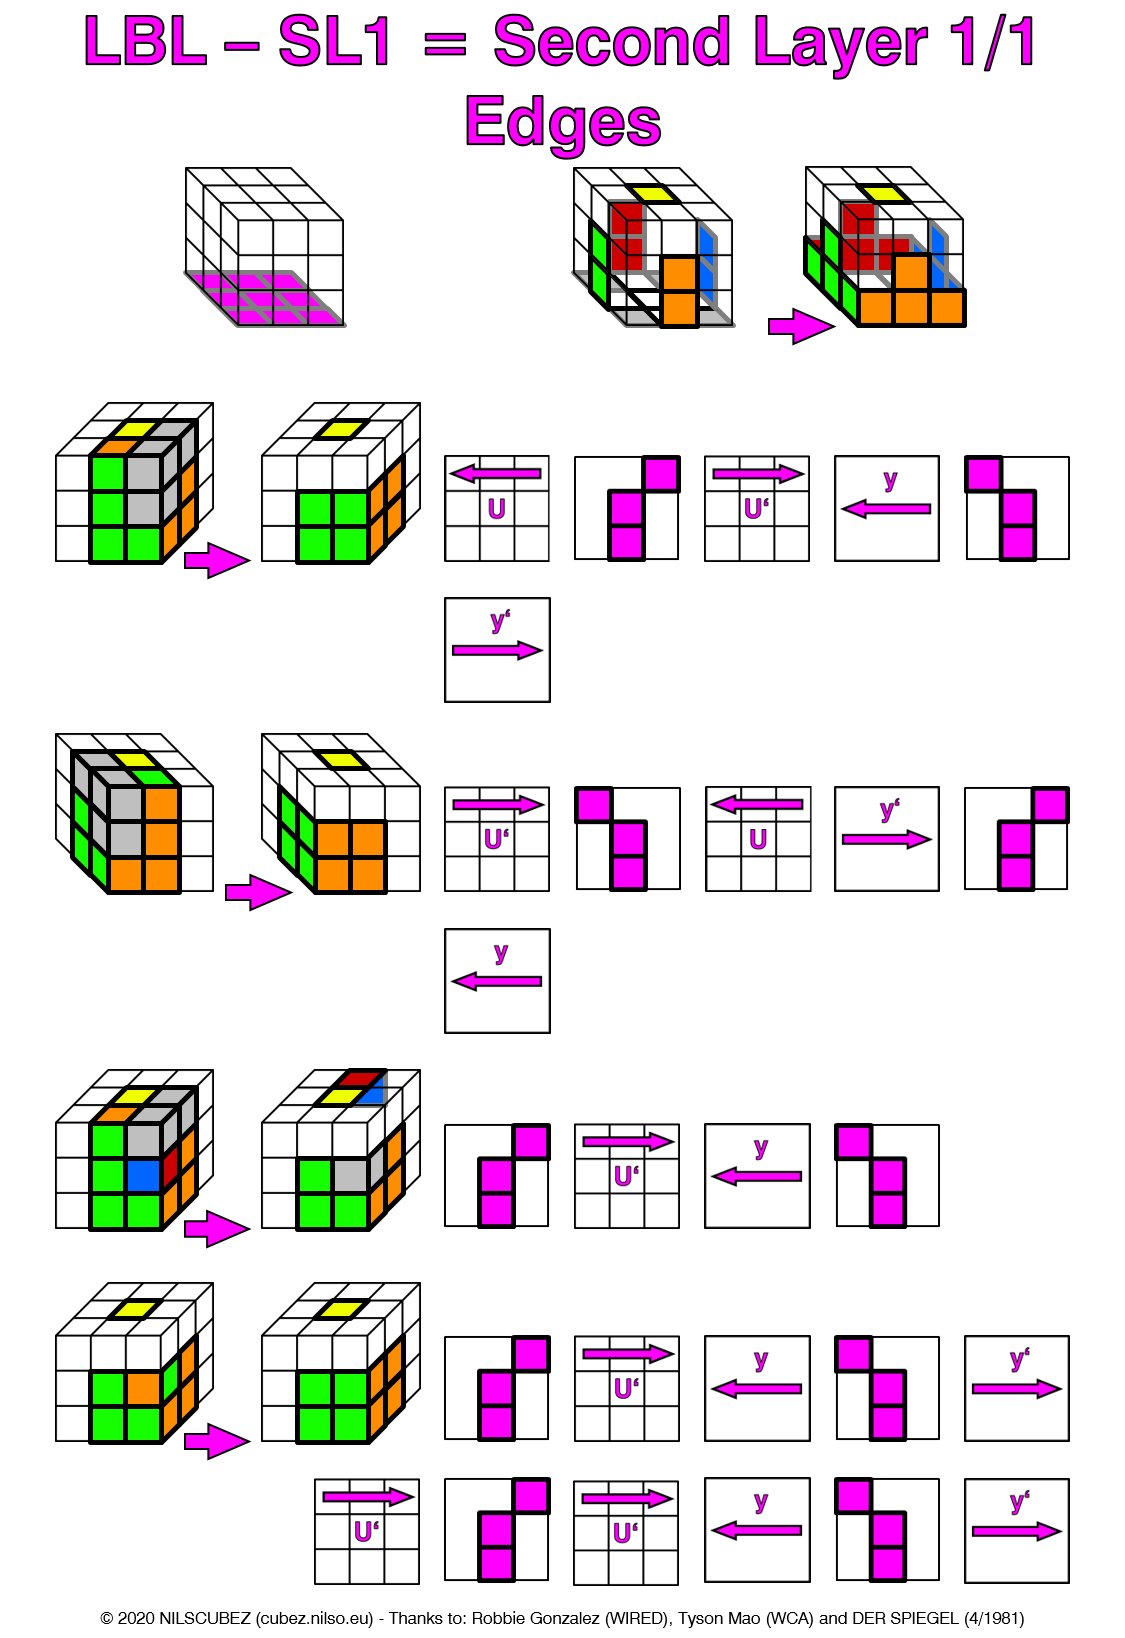
4.) Edges of second layer
The second layer has only 4 movable pieces: The edge pieces without white (Down side) or yellow (Up side) sides. The solution is quite easy: The edge piece is positioned, then the corner piece below the “target slot” of the edge piece is moved to the Up layer and back to its position in the Down layer, taking the edge piece with it.
There are two sets of algorithms for that, a left and a right one. The algorithms are really easy to learn as they are mostly a combination of the Trigger Moves used before. For edge pieces in the second layer that aren’t positioned correctly, yet, there are two additional algorithms based on the previous ones.
Last layer
The sequence of the solution of the last layer and most of the algorithms are taken from the original solution printed in issue 4/1984 of the German magazine Der Spiegel. I’ve been using these algorithms for many years and still think that they quite are easy to learn. If you only want to solve your cube every once in a while, then they are still very useful.
But if you really want to learn how to solve the cube and get faster, then I’d suggest to learn the OLL and PLL algorithms of the My 1st CFOP instructions instead. They are also quite easy to learn and it’s easier to get faster with them.
5.) Last Layer Edge Permutation
The first step in the last layer is to put all the edge pieces into their correct position. In this step we don’t care about the orientation of the colour stickers of each piece, yet.
The algorithm for that isn’t new: We just lift an edge piece from layer 2 into the upper layer and put the edge piece back into layer 2. This move also changes the position of two edge pieces in the upper layer and the orientation of the other two edge pieces in the upper layer.
If you have two swap two opposite edge pieces you just have to apply the algorithm twice, turning the cube into the right position between them.
6.) Last Layer Edge Orientation
Then the edges get their right orientation, so that after this step you get a complete “yellow cross” on your last layer. The algorithm is really simple, you just repeat R and E moves four times. This will mix up the cube quite a lot in layer 1 and 2 after the orientation of the first edge piece.
So for the next edge peace be sure that you only twist the upper layer to put the next edge piece on the right side. Then you repeat the algorithm and Layer 1 and 2 will be solved again.
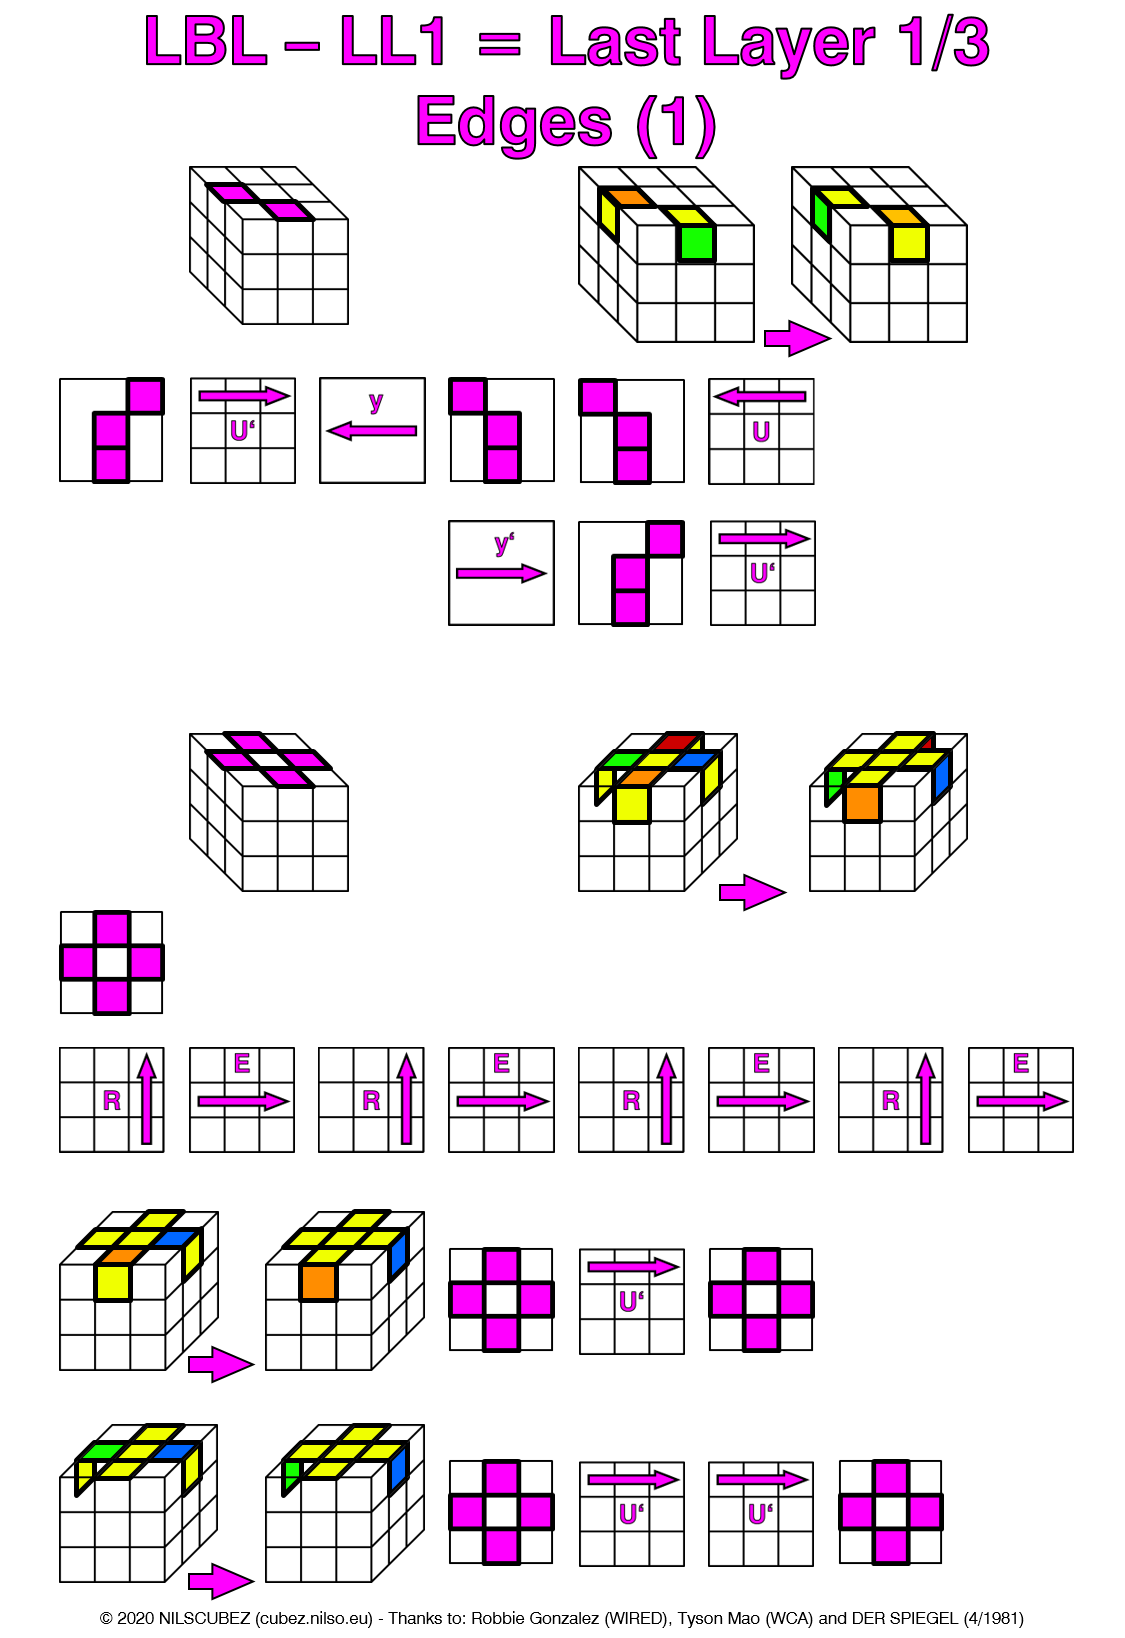
There are always 0, 2 or 4 edge pieces that need a new orientation, never 1 or 3. So for all edge pieces you have to apply the algorithm 4 times, always with a U’ move after the algorithm.
7.) Last Layer Corner Permutation
The next step is the correct position of all 3 edge pieces. The original algorithm from the Der Spiegel article had more than 20 steps, which made it quite hard to memorize. Years later I found a much shorter solution on a website, which only had 8 steps with the same effect. The corner piece in the rear left corner stays in position, while the algorithm moves the other the corner pieces counter clockwise.
8.) Last Layer Corner Orientation
The last thing to do is the right orientation of the corner pieces in the upper layer. The algorithm is once more easy to learn and quite fast to apply. There are only 8 steps, only moving the front and side layer of the cube.
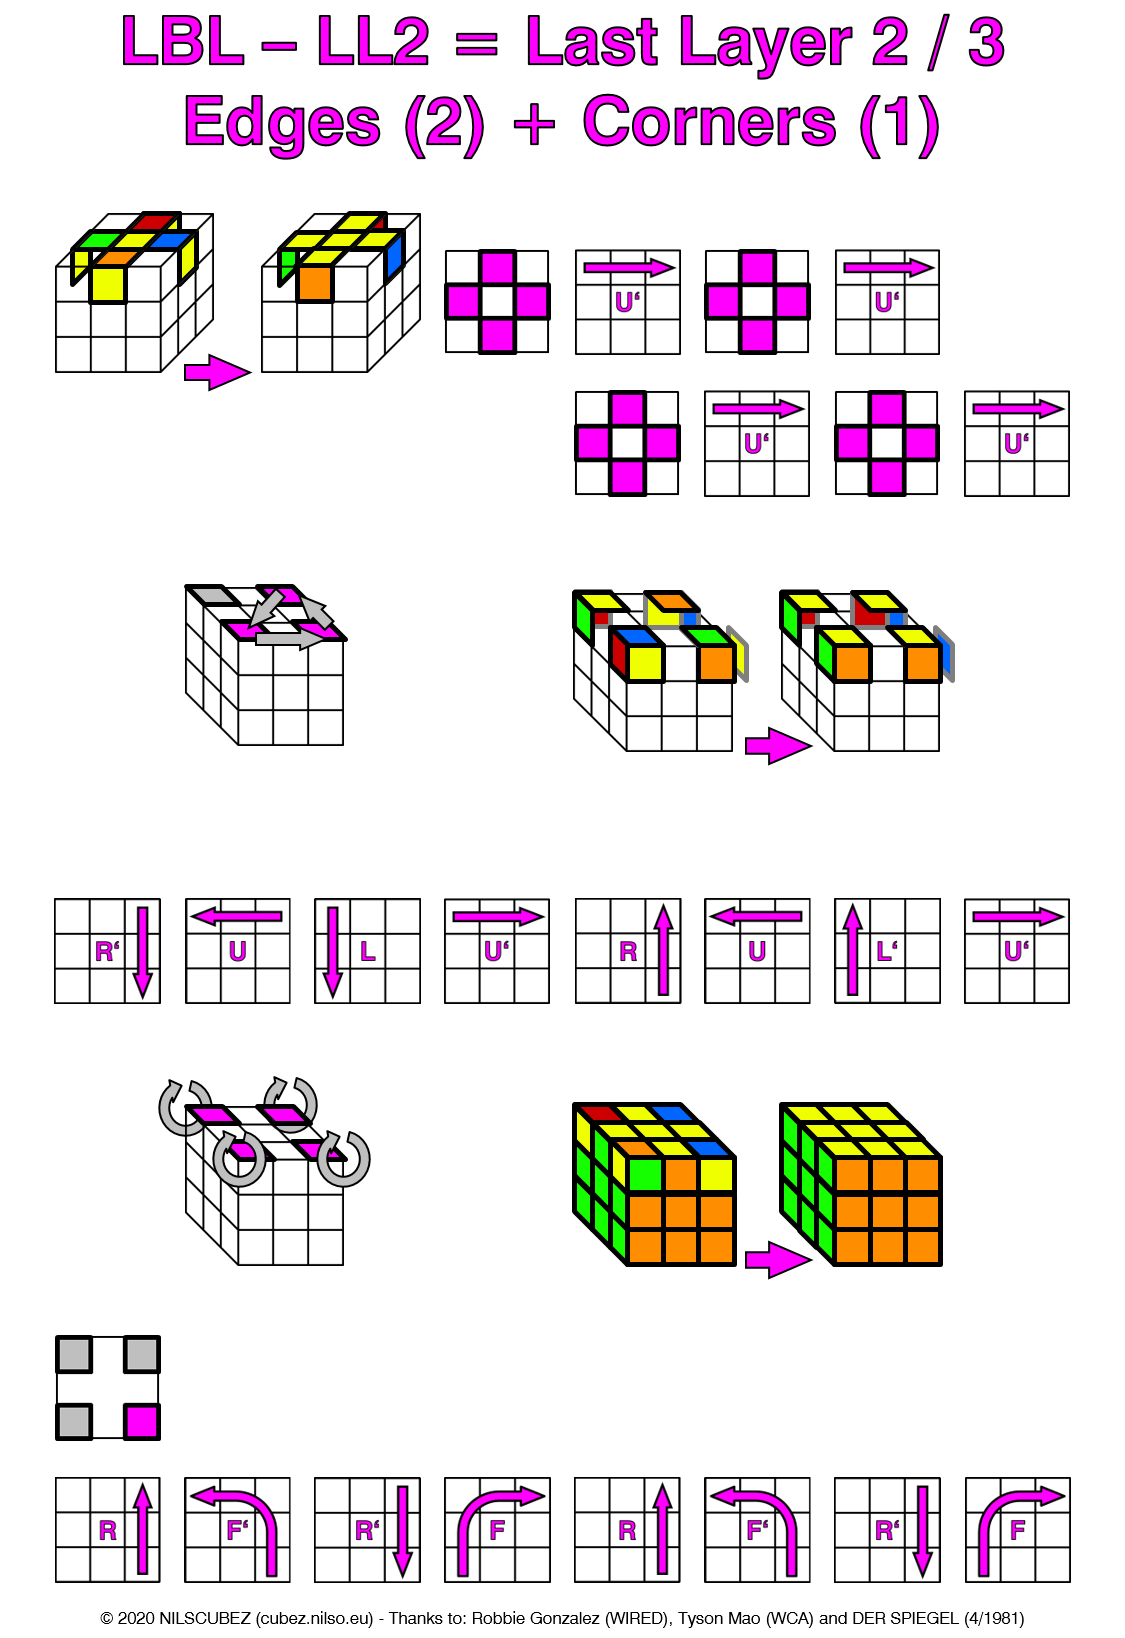
You will always turn the front right corner piece. As in step 6 (Last layer Edge Orientation), the algorithm will mix up layer 1 and 2 when it’s applied. In this case you will need 3 repetitions before both layers will be solved again.
So be sure once more that between two algorithms you only turn the upper layer and not the whole cube to position the next corner piece in the front right corner. Each corner piece might need one or two applications of the algorithm to get the right orientation (usually yellow on the upper side). To get all four corners right, you will need 0, 3 or 6 repetitions of the algorithm, plus a total of 4 U’ moves.
You will never need 1, 2, 4 or 5 repetitions of the algorithm. If that’s the case, then at least one of the corner pieces has been twisted and forced into a wrong orientation.
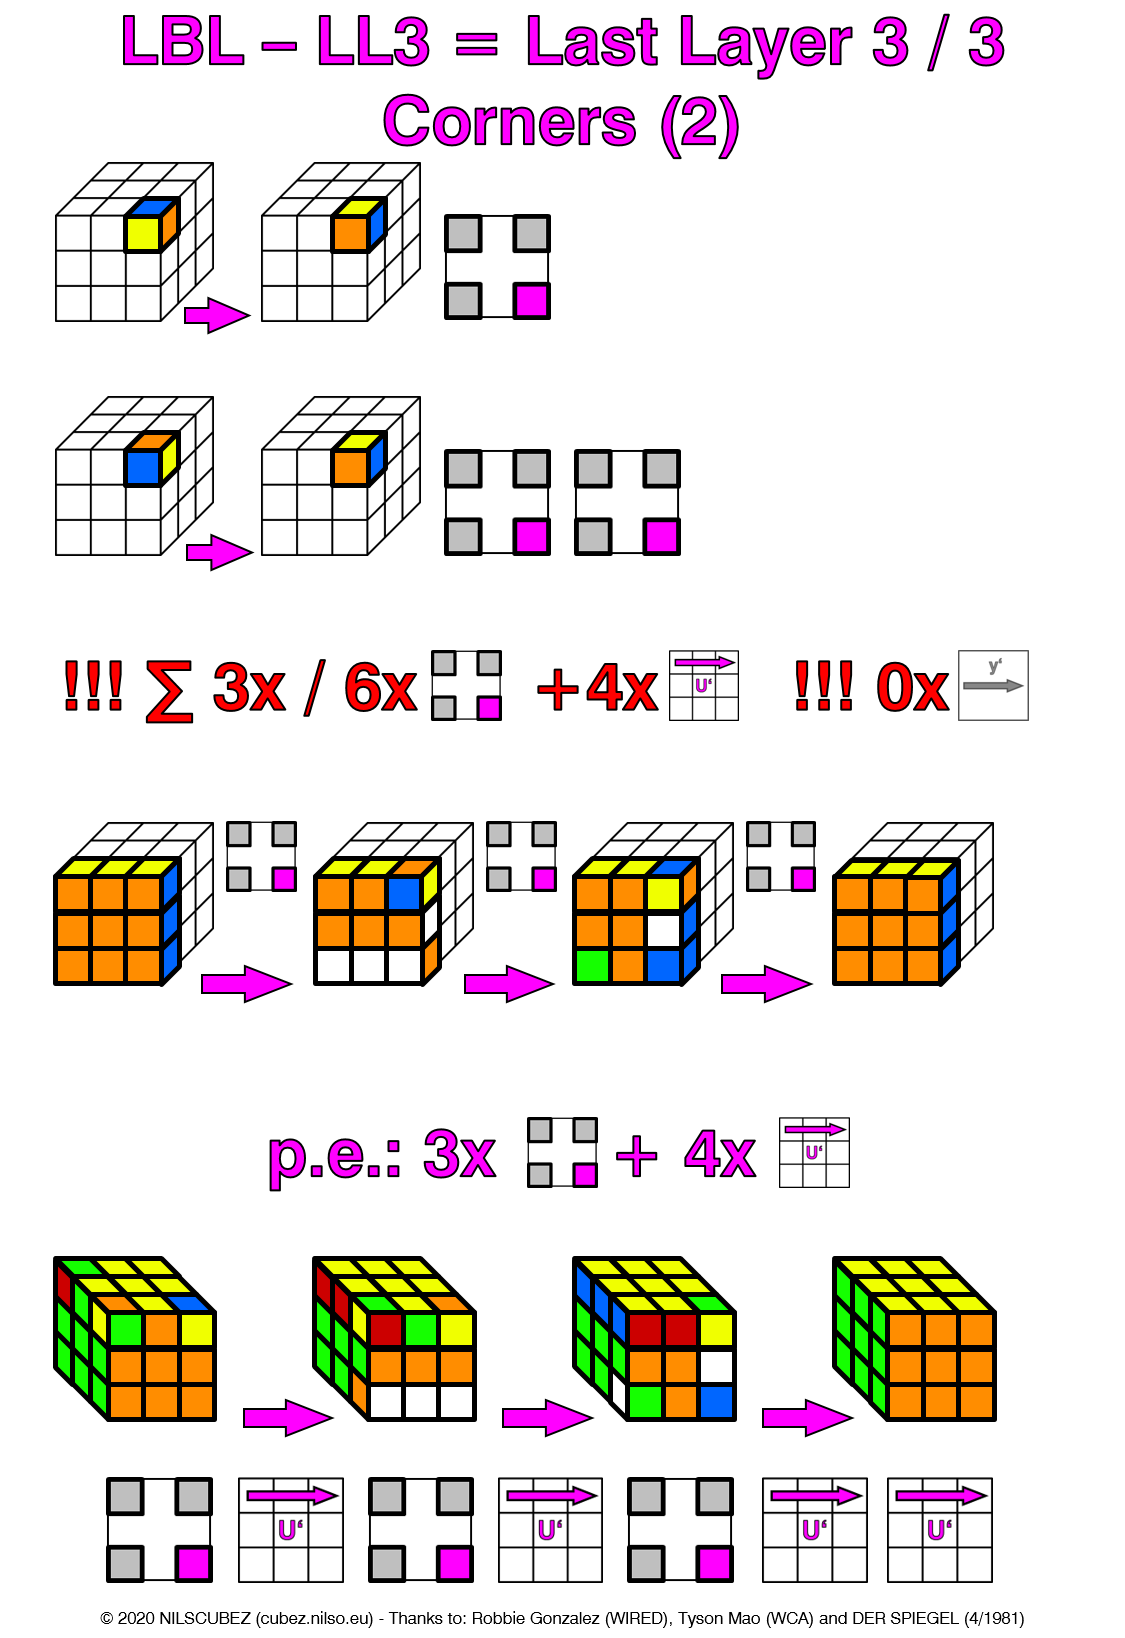
And that’s it! After Step 8.) you have solved your cube.
Congratulations!